The following sample describes the use of LogView Studio in a network setup. We use two different Windows Computer to show how it works.
Requirements
| • | You should be familiar with the 'normal' use of LogView Studio. |
| • | The Introduction 'LogView Studio and Network' should have been read and understood. |
| • | The computer must see each other within the network. |
| • | LogView Studio must be installed on both computers. |
| • | It may be necessary under some circumstances to open the TCP Port 2804 in the Firewall to allow communication with the database. |
Setting
For the following sample we use two different Windows systems (Windows 7 64Bit and Windows XP 32 Bit). Both computers are connected with the same network and LogView Studio is installed on both PC's.
Computer 1 - Windows XP
| • | LogView Studio has been started |
| • | A Project has been created and one device has been added (in this case a 'Junsi 4010 DUO' Charger) |
| • | The device is connected to the computer, ready for operation and can deliver data to LogView Studio. |
Computer 2 - Windows 7
| • | LogView Studio has been started |
| • | No project has been (yet) created |
Procedure
Computer 2 shall get access to the project of computer 1 and display the data (on computer 2).
| • | First identify the IP address of computer 2. The most easy way to do this under windows is by using the command function: - Press 'WINDOWSkey' + 'R' - Enter 'cmd' and confirm with the 'Return'-key - The console window will open. Enter 'ipconfig' and press 'Return' - You will see the list of available network adapters and their details. Look for the actual connection (LAN or WLAN) and write down the mentioned IP address. A good help in this respect maybe also to read the following: http://www.tippscout.de/windows-xp-ip-adresse-des-computers-ermitteln-und-herausfinden_tipp_2676.html http://www.wikihow.com/Find-the-IP-Address-of-Your-PC 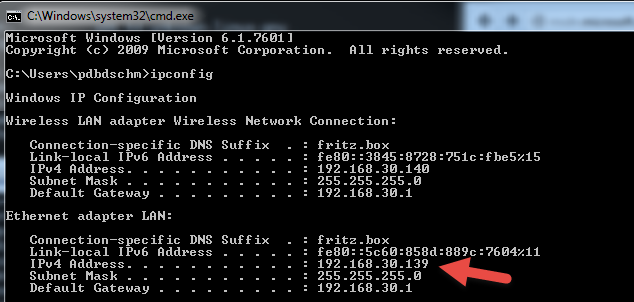 In this sample the IP address (of computer 2) is 192.168.30.139. |
| • | Next step is to open computer 1 for an access of computer 2. There is a separate button in LogView Studio's 'Tools' menu called 'Add Host to DB': 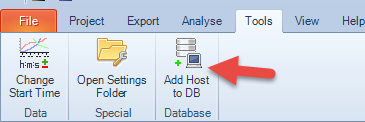 A new dialog window will open where the IP Address (or Hostname) of the remote computer which shall get access to the existing project must be entered. In our case this is the (just identified IP address) of computer 2 (Windows 7). 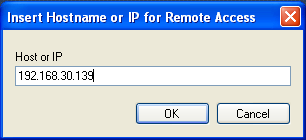 Confirm and close the window by selecting the 'OK' button. |
| • | Now you can start on computer 2 (the LogView Studio Program is already running) a new project but a remote project. Select 'Remote Project' in the 'File' menu: 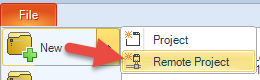 |
| • | In the following dialog you should Create a new Project Folder. This folder is necessary locally to store data (like e.g. charts). |
| • | Select 'Next' to go to the next page of the dialog. Here you have to enter the IP address (or Hostname) of that computer where the active Project is running (in our case computer 1 - XP).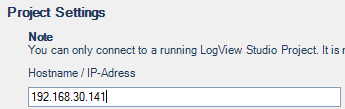 |
| • | Then you can check the network connection:  |
| • | If everything is OK, close the dialog by selecting the 'Finish' button. |
| • | Final status result should be now a running LogView Studio on both computers where computer 2 (WIN 7) retrieves the running project data of computer 1 (XP): 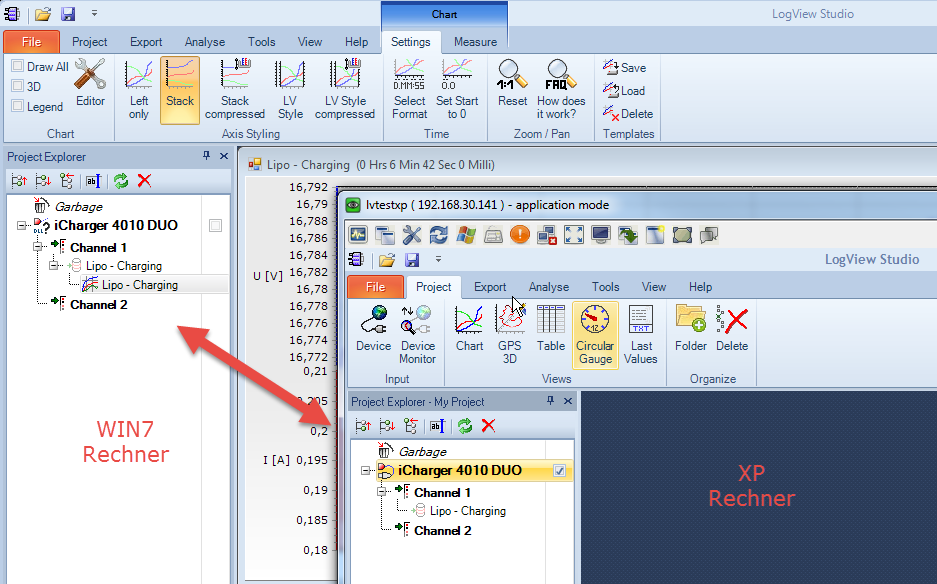 |
Note
You can connect to one project as many (remote-)computer as you like.
Note
Also with LogView Studio Command you can establish a network connection to such a project!
Accessibility via Internet
The above setup is also possible if one or more computer shall access to the project via Internet. But in that case the Firewall and/or the router must be configured accordingly. The keyword is then amongst others the 'Portforwarding'.
Important to know is that the remote computer should have access to Port 2804.
Additional Information
In case of further questions feel free to check our Forum (http://www.logview.info/forum/index.php) and look for 'LogView Studio' for possible solutions or raise your questions to the community. Also we as Authors are checking the Forum to give support whenever possible.